
Hello there! Are you ready to block ADS once and for all? Good ᗜ⩊ᗜ
BUT.
First, we need to address a couple of things.
In order for you to fully comprehend PiHole’s capabilities and limitations, we first need to do a small deep dive.
It won’t take long.
Pinky promise >⩊<
PiHole is a network level DNS “sinkhole” designed to basically block ADS , trackers and potentially malicious domains across all devices on a network without requiring client side software; pretty neat!
It operates by intercepting DNS queries and selectively refusing or redirecting those that match known blocklists (you can find popular blocklists on Github)
1. DNS based blocking
PiHole leverages the domain name system.
What does that mean?
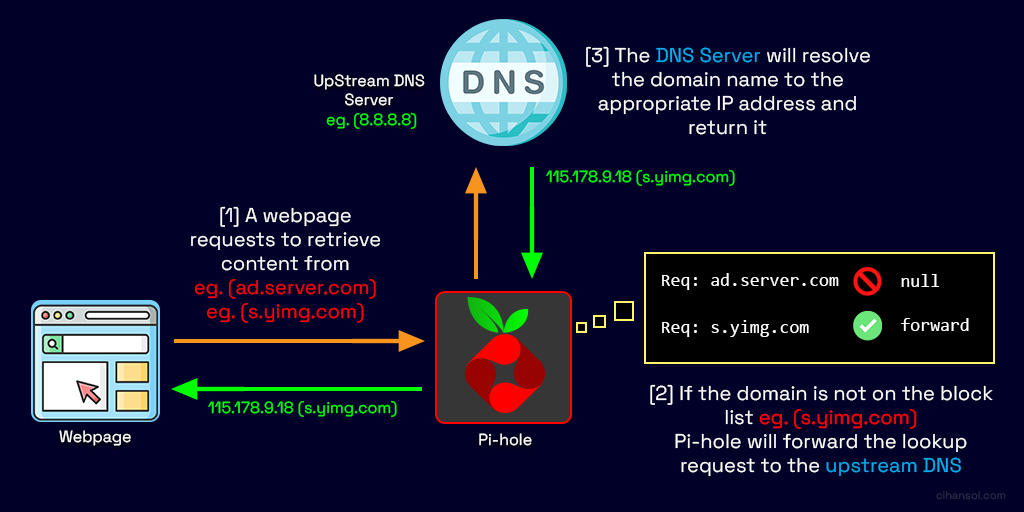
when a device requests a domain (e.g ads.example.com), a DNS resolver translates that into an IP address.
PiHole sits between them into this process:
- A client sends a DNS query.
- PiHole receives the query instead of a public resolver.
- It checks the domain against blocklists.
- If blocked → returns a “null” response (e.g. 0.0.0.0 or NXDOMAIN)
- If allowed → forwards the query to an upstream DNS server.
Your PiHole installation consists of several tightly integrated components:
1. A DNS engine
- Powered by FTLDNS, a custom fork combining:
- dnsmasq (lightweight DNS server)
- additional telemetry and performance logic (wont go into details hehe sorry qwq)
- It handles:
- query parsing
- cache management
- blocklist matching
- statistics collection
2. Web Interface
- Built with:
- PHP
- JS
- Displays:
- query logs
- top domains
- block rates
- client activity
3. Gravity database
- it’s a compiled SQLite database:
- source lists → merged → deduplicated → optimized
- stored as gravity.db
- Contains:
- blocked domains
- allowlists
- regex filters
When a device sends a DNS request:
@ ads.tracker.com
- PiHole listens on port 53 (TCP).
- It receives the query via:
- router DHCP configuration
- manual DNS settings
- transparent DNS redirection
4. PiHole then evaluates:
a. exact match with hash lookup
- O(1) lookup via inmemory hash tables
b. regex matching
- using compiled regex rules (slower, but feasible ig qwq)
c. whitelist check
- overriding block decisions
Decision logic
| condition | action |
|---|---|
| Domain in blocklist | Return sinkhole IP |
| Domain allowed | Forward upstream |
| Cached | Return cached response |
5. Upstream resolution
If allowed and set up:
- Forwarded to providers like:
- Cloudflare (1.1.1.1)
- Google (8.8.8.8)
- Response cached for TTL duration
6. Response to client
- Returned to requester
- Logged in PiHole database
What’s really interesting about PiHole is its “sinkhole” technique
Instead of resolving:
ads.example.com → 192.168.1.100
Code language: CSS (css)
PiHole returns:
ads.example.com → 0.0.0.0
Code language: CSS (css)
So the connection fails instantly and no HTTP request is ever made : P
PiHole can respond:
NXDOMAIN (non-existent domain)
PiHole operates at DNS level, meaning it blocks the request before connection establishment.

Unlike firewall rules, it prevents even initial TCP handshake! Gravity list is loaded into fast RAM and avoids disk lookups during queries!
Limitations & weaknesses
Hardcoded DNS
Although quite powerful, PiHole cannot perform magic against apps that bypass it using build in DNS.
CDN & shared domains
Blocking a domain may break legit services hosted on the same domain as well ¯\_(ツ)_/¯

That’s it. Told ya it would be quick! Hehe, seriously, if you have any questions just drop a comment down below and i’ll try to answer exhaustively :3
Before you begin
- Update your system:
sudo apt update && sudo apt upgrade -yMethod 1: automated script installation
Quick Installation (Recommended)
The easiest way to install PiHole is using the official automated installer.
1. download and run the installer:
curl -sSL https://install.pi-hole.net | bashCode language: JavaScript (javascript)Or if you prefer to review the script first:
wget -O basic-install.sh https://install.pi-hole.net
sudo bash basic-install.shCode language: JavaScript (javascript)
2. follow the prompts
The installer will guide you through:
- Network interface selection: Choose the network interface PiHole will use (usually eth0 for Ethernet or wlan0 for WiFi)
- Upstream DNS provider: Select your preferred DNS provider:
- Google (8.8.8.8, 8.8.4.4)
- OpenDNS (208.67.222.222, 208.67.220.220)
- Cloudflare (1.1.1.1, 1.0.0.1)
- Quad9 (9.9.9.9, 149.112.112.112)
- Custom
- Blocklists: Confirm to use the default blocklists (recommended)
- Admin web interface: Choose to install the web admin interface (recommended)
- Web Server: Choose to install lighttpd web server (recommended)
- Query Logging: Enable query logging (recommended for statistics)
- Privacy Mode: Select your preferred privacy level
Note your login info
At the end of installation, you’ll see:
Admin password (save this!)
Web interface URL (usually http://pi-hole/admin or http://your-ip/admin)
To change the admin password later:
pihole -a -pMethod 2: manual installation

Okay this one’s a bit more complicated. If you are like me though, you don’t wanna skip it. I always do everything manually and compile my own stuff (Gentoo user hehe (• ω•))
1. Install dependencies
On Debian/Ubuntu/Raspberry Pi OS:
sudo apt update
sudo apt install -y git curl wget dnsutils net-tools
sudo apt install -y lighttpd php-cgi php-common php-sqlite3 php-xml php-json php-intl
sudo apt install -y sqlite3 cron
On CentOS/Fedora: (i’d personally stick with Debian but you do you)
sudo yum update -y
sudo yum install -y git curl wget bind-utils net-tools
sudo yum install -y lighttpd lighttpd-fastcgi php php-common php-cli
sudo yum install -y sqlite cronie
2. Create PiHole user and directories
# Create pihole user
sudo useradd -r -s /usr/sbin/nologin pihole

# Create necessary directories
sudo mkdir -p /etc/pihole
sudo mkdir -p /opt/pihole
sudo mkdir -p /var/www/html/adminCode language: PHP (php)
3. clone Pihole repository
cd /tmp
git clone --depth 1 https://github.com/pi-hole/pi-hole.git Pi-hole
cd Pi-holeCode language: PHP (php)
4. Install the core components
# Copy scripts
sudo cp -r /tmp/Pi-hole/advanced/Scripts /opt/pihole/
sudo cp -r /tmp/Pi-hole/automated\ install/basic-install.sh /opt/pihole/

# Set permissions
sudo chmod +x /opt/pihole/Scripts/*.shCode language: PHP (php)
Optional: Install FTL (Faster Than Light) DNS Engine
# Download FTL binary
cd /tmp
wget https://github.com/pi-hole/FTL/releases/latest/download/pihole-FTL-$(uname -m)-linux-gnu

# Install FTL
sudo mv pihole-FTL-* /usr/bin/pihole-FTL
sudo chmod +x /usr/bin/pihole-FTLCode language: PHP (php)
6. Create configuration files
Create /etc/pihole/setupVars.conf:
sudo tee /etc/pihole/setupVars.conf > /dev/null <<EOF
PIHOLE_INTERFACE=eth0
IPV4_ADDRESS=192.168.1.100/24
IPV6_ADDRESS=
QUERY_LOGGING=true
INSTALL_WEB_SERVER=true
INSTALL_WEB_INTERFACE=true
LIGHTTPD_ENABLED=true
CACHE_SIZE=10000
DNS_FQDN_REQUIRED=true
DNS_BOGUS_PRIV=true
DNSMASQ_LISTENING=single
WEBPASSWORD=
BLOCKING_ENABLED=true
PIHOLE_DNS_1=8.8.8.8
PIHOLE_DNS_2=8.8.4.4
EOFCode language: JavaScript (javascript)
Note: Replace 192.168.1.100/24 with your static IP and subnet, and eth0 with your network interface.
7. Configure dnsmasq
Create /etc/dnsmasq.d/01-pihole.conf:
sudo tee /etc/dnsmasq.d/01-pihole.conf > /dev/null <<EOF
addn-hosts=/etc/pihole/gravity.list
addn-hosts=/etc/pihole/black.list
addn-hosts=/etc/pihole/local.list

domain-needed
bogus-priv
no-resolv

server=8.8.8.8
server=8.8.4.4

interface=eth0
bind-interfaces

cache-size=10000
log-queries
log-facility=/var/log/pihole.log

local-ttl=2

conf-file=/etc/dnsmasq.d/02-pihole-dhcp.conf
conf-file=/etc/dnsmasq.d/05-pihole-custom-cname.conf
EOFCode language: JavaScript (javascript)
8. set up gravity (blocklist db)
# Create initial gravity database
sudo touch /etc/pihole/gravity.list
sudo touch /etc/pihole/black.list
sudo touch /etc/pihole/whitelist.txt
sudo touch /etc/pihole/regex.list

# Set ownership
sudo chown -R pihole:pihole /etc/piholeCode language: PHP (php)
9. configure web interface
# Clone web interface
cd /var/www/html
sudo git clone --depth 1 https://github.com/pi-hole/AdminLTE.git admin

# Set permissions
sudo chown -R www-data:www-data /var/www/htmlCode language: PHP (php)
Configure lighttpd —> create /etc/lighttpd/conf-available/15-pihole-admin.conf:
sudo tee /etc/lighttpd/conf-available/15-pihole-admin.conf > /dev/null <<EOF
\$HTTP["url"] =~ "^/admin/" {
    setenv.add-response-header = (
        "X-Pi-hole" => "The Pi-hole Web interface is working!",
        "X-Frame-Options" => "DENY"
    )
}

\$HTTP["url"] == "/admin" {
    url.redirect = ("" => "/admin/")
}
EOFCode language: PHP (php)
Enable the configuration:
sudo ln -s /etc/lighttpd/conf-available/15-pihole-admin.conf /etc/lighttpd/conf-enabled/
sudo lighttpd-enable-mod fastcgi
sudo lighttpd-enable-mod fastcgi-php
sudo service lighttpd restart
10. Create systemd Service for FTL
Create /etc/systemd/system/pihole-FTL.service:
sudo tee /etc/systemd/system/pihole-FTL.service > /dev/null <<EOF
[Unit]
Description=PiHole FTL
After=network.target

[Service]
Type=forking
ExecStart=/usr/bin/pihole-FTL
Restart=on-failure
RestartSec=5s

[Install]
WantedBy=multi-user.target
EOFCode language: JavaScript (javascript)
Enable and start the service:
sudo systemctl daemon-reload
sudo systemctl enable pihole-FTL
sudo systemctl start pihole-FTL
11. set up the pihole command
# Create symlink for pihole command
sudo ln -s /opt/pihole/Scripts/pihole /usr/local/bin/pihole
sudo chmod +x /usr/local/bin/piholeCode language: PHP (php)
12. update gravity (download blocklists)
pihole -gand set admin password:
pihole -a -p
Told ya it’d be easy to install like a walk in the park :3
Post install configuration
1. Access the web interface
Navigate to:
- http://pi-hole/admin or
- http://your-ip/admin
Log in with the password you set during installation.
2. Configure your router
Set your router’s DNS server to your PiHole’s IP address. This varies by router, but typically:
- Log into your router’s admin interface
- Find DHCP or DNS settings
- Set Primary DNS to your PiHole’s IP (e.g., 192.168.1.100)
- Set Secondary DNS to a fallback (e.g., 8.8.8.8) or leave blank for PiHole only
- Save and reboot the router
3. Configure individual devices (alternative)
If you don’t want to change router settings, configure DNS on each device:
Windows:
- Network Settings —> Change adapter options → Right-click adapter → Properties
- Select “Internet Protocol Version 4 (TCP/IPv4)” → Properties
- Use the following DNS server addresses: Enter your PiHole IP
macOS:
- System Preferences → Network → Advanced → DNS
- Add your PiHole IP using the + button
Linux:
- Edit
/etc/resolv.confor use NetworkManager
iOS/Android:
- WiFi Settings → Configure DNS → Manual → Add Server
4. Add additional blocklists
In the web interface:
- Go to “Group Management” → “Adlists”
- Add blocklist URLs (search for “pihole blocklists” for community recommendations)
- Update gravity: pihole -g
Popular blocklist sources:
5. Whitelist/Blacklist domains
Via Web Interface:
- Tools → Query Log (to find domains to whitelist)
- Blacklist/Whitelist → Add domains
If you wanna do this via cmd:
# Whitelist
pihole -w example.com

# Blacklist
pihole -b ads.example.com

# Regex whitelist
pihole --regex-whitelist ".*\.example\.com$"

# Regex blacklist
pihole --regex-blacklist "^ad[sx]?[0-9]*\."Code language: PHP (php)
Set up local DNS records
Add local DNS entries for devices on your network:
# Edit local DNS file
sudo nano /etc/pihole/custom.list

# Add entries in format: IP_ADDRESS HOSTNAME
192.168.1.10 myserver.local
192.168.1.20 printer.localCode language: PHP (php)
and then restart:
pihole restartdnsTroubleshooting
Pihole not blocking Ads?
- Check DNS is pointing to PiHole:
nslookup pi.holeCode language: CSS (css)2. Verify FTL is running:
sudo systemctl status pihole-FTL3. Check gravity database:
pihole -g4. Flush DNS cache on client devices
Web interface not accessible
- Check lighttpd status:
sudo systemctl status lighttpd2. Restart lighttpd:
sudo systemctl restart lighttpd3. Check firewalls
sudo ufw allow 80/tcp
sudo ufw allow 53/tcp
sudo ufw allow 53/udp
DNS resolution issues
- Check upstream DNS servers:
pihole -c -e2. Test DNS resolution
dig @127.0.0.1 google.comCode language: CSS (css)3. Check dnsmasq configuration:
pihole-FTL dnsmasq-testReset admin password:
pihole -a -pUpdate pihole:
pihole -upWanna uninstall it? Messed something up?
Just nuke your entire OS hehe :3
Well you can but what would be the point of this whole ass blog post?

fine.
pihole uninstallView logs:
# Real-time query log
pihole -t

# FTL log
sudo cat /var/log/pihole-FTL.log

# Web server log
sudo cat /var/log/lighttpd/error.logCode language: PHP (php)
Check pihole status:
pihole statusRestart pihole services:
# Restart DNS
pihole restartdns

# Restart FTL
sudo systemctl restart pihole-FTL

# Restart web server
sudo systemctl restart lighttpdCode language: PHP (php)
Useful commands
# Update gravity (blocklists)
pihole -g

# Enable/disable blocking
pihole enable
pihole disable [time]

# Tail the query log
pihole -t

# Check version
pihole -v

# Update PiHole
pihole -up

# Reconfigure
pihole -r

# Uninstall
pihole uninstall

# Debug
pihole -d

# Whitelist/Blacklist
pihole -w domain.com
pihole -b domain.com

# Query database
pihole -q domain.com

# Chronometer (live stats)
pihole -cCode language: PHP (php)
Additional resources
- Official Documentation: https://docs.pi-hole.net/
- Discourse Forum: https://discourse.pi-hole.net/
- GitHub: https://github.com/pi-hole/pi-hole
- Reddit: r/pihole
! Note !: Always ensure you have a backup DNS solution in case PiHole goes down. Consider setting up a secondary PiHole or having a backup DNS server configured on critical devices.
Leave a Reply